Introduction
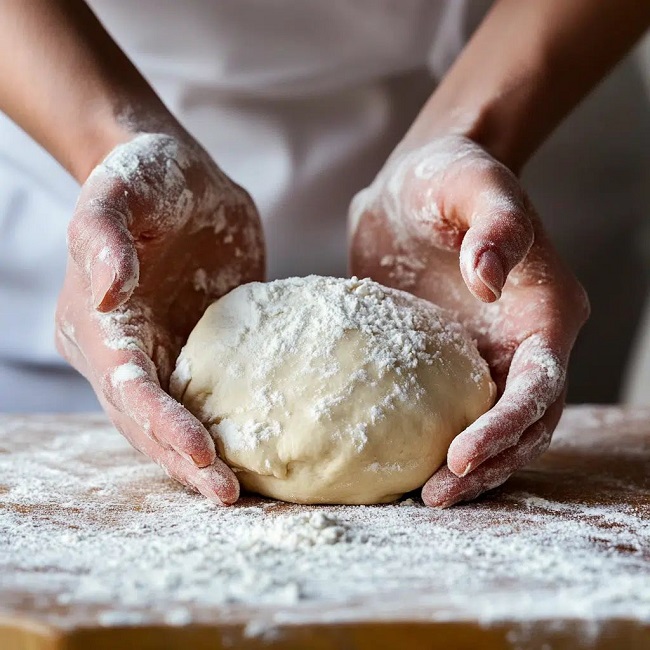
Self rising flour Recipe is a must-have ingredient for every baker who wants consistent, fluffy, and perfectly risen baked goods. Self rising flour is different from all-purpose flour because it comes pre-mixed with baking powder and a pinch of salt, saving time and reducing the risk of measurement errors. This makes it ideal for biscuits, pancakes, muffins, cakes, and quick breads, especially for home bakers who want reliable results every time.
Self rising flour Recipe is important in baking because it guarantees light, airy textures without the need for complicated steps. Self rising flour simplifies recipes by combining key leavening ingredients with flour, which allows even beginners to achieve professional-quality results. In the USA, it has become a staple in many kitchens, particularly for classic Southern recipes where perfectly risen biscuits and soft, tender cakes are expected.
Self rising flour Recipe is perfect for home bakers, beginners, and USA-based readers who want to elevate their baking skills. Self rising flour helps reduce baking stress, letting you focus on creativity rather than precision. Whether you’re making a quick batch of pancakes or preparing a special dessert, self rising flour ensures consistent rise and texture every time.
Self rising flour is the focus of this comprehensive guide, where you’ll learn not just recipes, but also smart substitutes, proper storage techniques, FAQs, and professional baking tips. Self rising flour can even be made at home if you don’t have it on hand, giving you flexibility and control over your baking.
Self rising flour Recipe will transform the way you bake by making even complex recipes approachable. By the end of this post, you’ll know how to use it, store it, and apply pro tips for delicious, fluffy, and perfectly baked treats. Self rising flour is more than an ingredient—it’s a key to baking success.
What is Self Rising Flour Recipe?
Self rising flour is a versatile baking ingredient that combines all-purpose flour with a precise amount of baking powder and a pinch of salt. Unlike regular flour, it eliminates the need for separate leavening agents, making it a convenient choice for both beginners and experienced bakers. Whether you’re in the USA, where it’s a staple for Southern-style biscuits and pancakes, or in the UK, where it’s commonly used for scones and pastries, self rising flour ensures consistent rise and perfect texture every time.
Self Rising Flour Meaning
Understanding the self rising flour meaning is crucial for successful baking:
- Definition: Flour that rises naturally during baking due to pre-added baking powder.
- Purpose: Saves time and reduces errors by providing a ready-to-use mix.
- Regional Differences:
| Region | Typical Uses |
|---|---|
| USA | Biscuits, pancakes, muffins, quick breads |
| UK | Scones, pastries, cakes |
Self Rising Flour vs All-Purpose Flour
Choosing between self rising flour and all-purpose flour can impact your baking results:
- All-Purpose Flour: Requires baking powder or baking soda for leavening.
- Self Rising Flour: Ready-to-use, ensuring even rise and light texture.
- Benefits of Self Rising Flour:
- Reduces baking errors for beginners
- Saves preparation time
- Guarantees fluffy and tender baked goods
- Ideal for quick recipes without complicated measuring
Popular Uses of Self Rising Flour Recipe
A self rising flour recipe can be applied in multiple delicious ways:
- Biscuits: Light, airy, and soft.
- Pancakes: Fluffy, evenly risen, and perfect for breakfast.
- Cakes & Muffins: Tender crumb without additional leavening.
- Quick Breads & Coffee Cakes: Fast and consistent baking.
- Creative Recipes: Pizza dough, fritters, and savory baked goods.
Why Self Rising Flour is Essential
- Saves time in busy kitchens
- Beginner-friendly and foolproof
- Provides consistent baking results
- Versatile for both sweet and savory dishes
What is self rising flour used for? Following a self rising flour recipe allows bakers to achieve professional-quality results effortlessly. From classic Southern biscuits to fluffy pancakes and innovative desserts, self rising flour is a must-have ingredient that simplifies baking while delivering delicious outcomes.
Ingredients for the Perfect Self Rising Flour Recipe
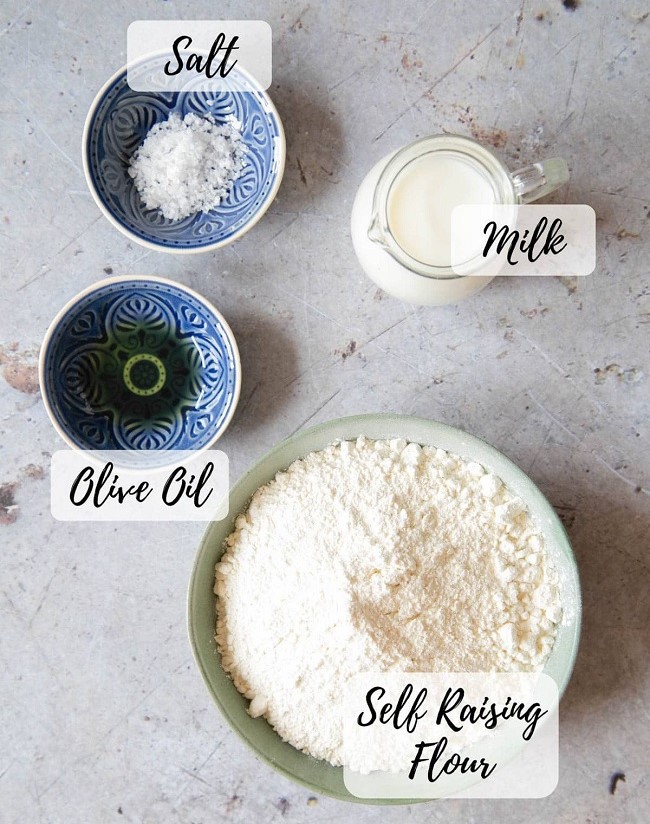
Creating the perfect self rising flour recipe starts with understanding the essential ingredients and their roles. This simple combination ensures consistently light, fluffy, and flavorful baked goods. Whether you are a beginner baker in the USA or an experienced home cook, mastering these ingredients is key to successful baking.
Essential Ingredients
- All-Purpose Flour (Base):
All-purpose flour forms the foundation of any self rising flour recipe. It provides structure to biscuits, pancakes, muffins, and cakes. For best results, use fresh, high-quality flour to achieve a tender crumb and even rise. - Baking Powder (Leavening Agent):
Baking powder gives self rising flour its rising power. It creates air pockets in the batter, resulting in fluffy and light textures. Precision is important: too much can cause an uneven rise, while too little will make baked goods dense and heavy. - Salt (Flavor Enhancer):
A pinch of salt balances sweetness, enhances flavor, and strengthens the flour’s structure. Even a small amount ensures your baked goods taste perfectly seasoned.
Optional Variations
Customizing your self rising flour recipe allows for dietary preferences or unique flavors:
- Whole Wheat Self Rising Flour: Adds nutty flavor and extra fiber.
- Gluten-Free Self Rising Flour: Use gluten-free flour blends with xanthan gum for structure.
- Organic or Unbleached Flour: Offers cleaner taste and healthier baking options.
Measurement Guide
Accurate measurements are critical to a successful self rising flour recipe. Use the table below for reference:
| Ingredient | Measurement (Cups) | Measurement (Grams) |
|---|---|---|
| All-Purpose Flour | 1 cup | 120 g |
| Baking Powder | 1 1/2 tsp | 6 g |
| Salt | 1/4 tsp | 1.5 g |
Pro Tips for Perfect Results
- Sift ingredients together to ensure even distribution of baking powder and salt.
- Store in an airtight container for up to 3 months to maintain freshness.
- Adjust for variations: Gluten-free flours may require slightly more liquid.
Using the right ingredients in your self rising flour recipe guarantees consistently fluffy, tender, and flavorful baked goods. From soft breakfast pancakes to classic Southern biscuits or quick breads, knowing your ingredients and measurements ensures every bake is a success.
Step-by-Step Self Rising Flour Recipe (With Exact Measurements)
Creating a self rising flour recipe at home is easier than you think. Whether you are following a self rising flour recipe step by step or making a DIY self rising flour batch, this guide ensures perfectly light, fluffy, and consistent baked goods every time. By using precise measurements and proper storage, your homemade flour mix will outperform store-bought versions.
Ingredient Measurements (Cups, Grams & Ounces)
Accuracy is essential in a self rising flour recipe. Use the table below for exact proportions:
| Ingredient | Cups | Grams | Ounces |
|---|---|---|---|
| All-Purpose Flour | 1 cup | 120 g | 4.2 oz |
| Baking Powder | 1 1/2 tsp | 6 g | 0.2 oz |
| Salt | 1/4 tsp | 1.5 g | 0.05 oz |
Pro Tip: For larger batches, multiply all ingredients proportionally and sift thoroughly to distribute the leavening evenly.
Mixing Instructions (Step-by-Step)
Follow this self rising flour recipe step by step for consistent results:
- Measure ingredients accurately using the table above.
- Sift flour, baking powder, and salt together into a large mixing bowl to remove lumps.
- Whisk the mixture for 1–2 minutes to ensure even distribution of the leavening agent.
- Optional: Add whole wheat flour or gluten-free flour blends for variations.
- Use immediately in your favorite recipes, or store in an airtight container for later use.
✅ DIY self rising flour tip: If baking powder is unavailable, add 1 tsp baking powder plus a pinch of salt per cup of all-purpose flour.
How to Store Self Rising Flour at Home
Proper storage preserves the potency of your DIY self rising flour:
- To avoid moisture absorption, store in an airtight container.
- Keep in a cool, dry place away from sunlight.
- Label with the date to monitor freshness.
Shelf Life & Freshness Tips
Understanding shelf life is crucial for maintaining a high-quality self rising flour recipe:
- Shelf life: Up to 3 months at room temperature in an airtight container.
- Tip: Baking powder loses potency over time, so refresh your DIY self rising flour every few months.
- Optional: Store a small batch in the fridge for longer freshness.
Making a self rising flour recipe at home is both practical and cost-effective. By following this step-by-step guide, you can create bakery-quality biscuits, pancakes, muffins, and cakes with light, fluffy textures. Mastering this DIY self rising flour ensures consistent results, saves money, and adds confidence to your home baking routine.
Best Recipes Using Self Rising Flour
A self rising flour recipe is one of the most versatile tools in the kitchen. From breakfast pancakes to classic British cakes and Southern biscuits, self rising flour ensures light, fluffy, and consistent results every time. Here are some of the best recipes using this essential ingredient.
1. Victoria Sponge Cake Recipes
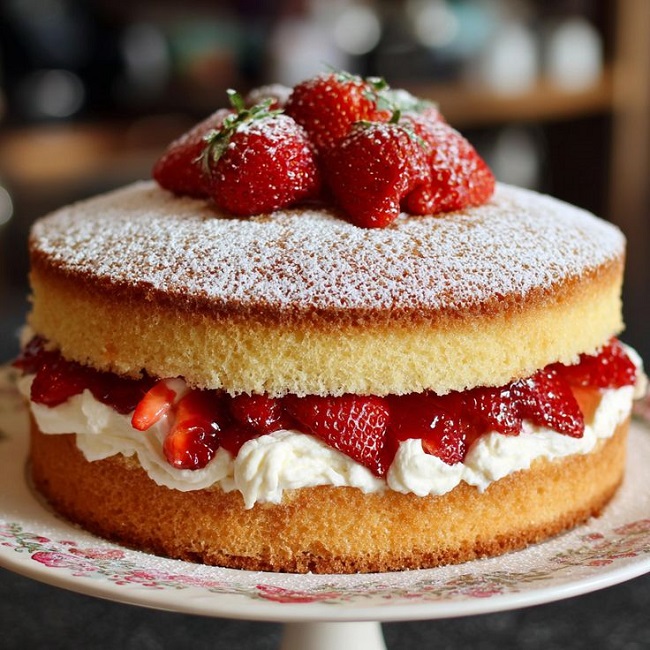
Victoria sponge cake is a soft, airy dessert perfect for tea time or celebrations. Using a self rising flour recipe ensures a tender crumb and even rise, making this classic cake beginner-friendly and foolproof.
Ingredients:
- 1 cup self rising flour
- 1/2 cup unsalted butter, softened
- 1/2 cup sugar
- 2 large eggs
- 2 tbsp milk
- 1 tsp vanilla extract
Steps:
- Grease two 8-inch cake pans and preheat the oven to 350°F (175°C).
- Cream butter and sugar until light and fluffy.
- Beat in eggs one at a time, followed by vanilla.
- Fold in self rising flour and milk until smooth.
- Divide batter evenly between pans and bake for 20–25 minutes.
- Cool completely before filling with jam or frosting.
Tips:
- Sift the self rising flour for an extra light sponge.
- Avoid overmixing to keep the cake tender.
2. Yorkshire Pudding Recipes
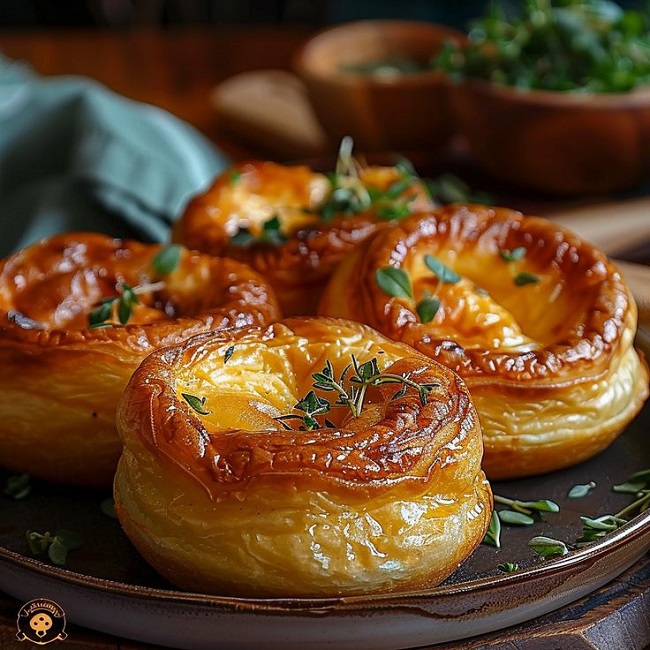
Yorkshire pudding is a classic British dish with a crisp exterior and soft, fluffy interior. A self rising flour recipe helps achieve perfect puff and golden color without complicated preparation. Ideal for Sunday roasts or festive dinners, it guarantees consistent rise and texture, making this traditional side dish easy to master at home.
Ingredients:
- 1 cup self rising flour
- 1 cup milk
- 2 large eggs
- 1/2 tsp salt
- 2 tbsp vegetable oil
Steps:
- Preheat oven to 425°F (220°C).
- Whisk eggs, milk, and salt together.
- Gradually add self rising flour until smooth.
- Heat oil in a muffin tin until smoking hot.
- Pour batter into tins and bake for 20–25 minutes until puffed and golden.
Tips:
- Do not open the oven while baking to ensure maximum rise.
- Use room temperature milk and eggs for better results.
3. Welsh Cakes Recipes
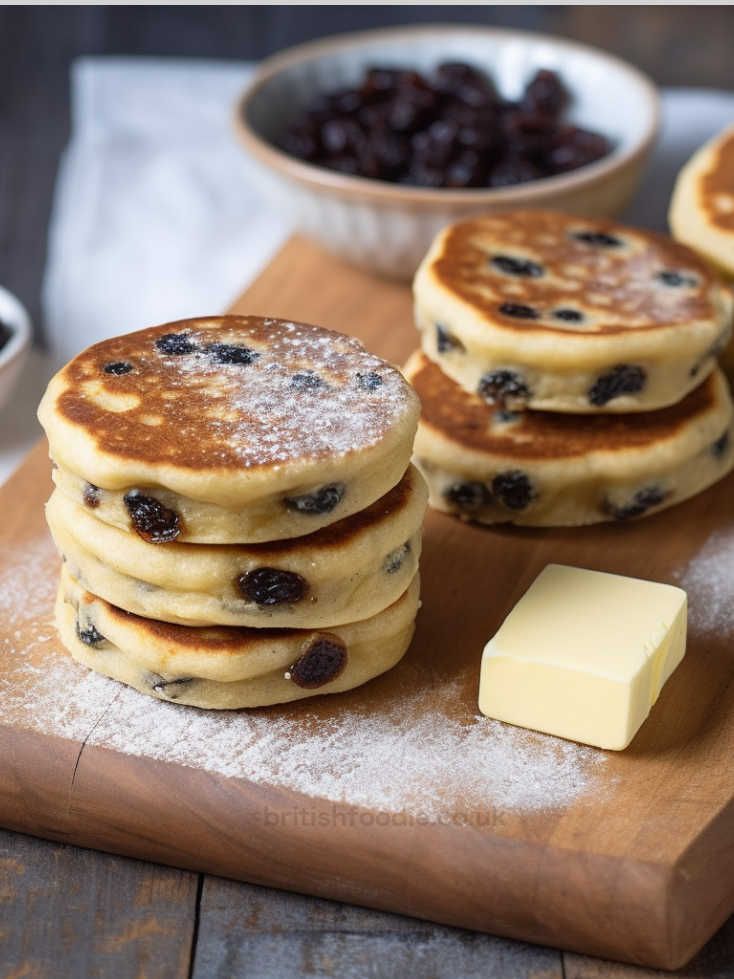
Welsh cakes are lightly sweet, tender griddle cakes ideal for tea time. Using a self rising flour recipe produces evenly cooked cakes with a soft texture that holds currants or raisins beautifully. Quick, simple, and delicious, these treats are perfect for beginners and seasoned bakers seeking authentic flavors with minimal effort.
Ingredients:
- 1 cup self rising flour
- 1/4 cup sugar
- 1/4 cup butter
- 1/4 cup currants or raisins
- 1 egg
- 1/2 tsp vanilla extract
Steps:
- Rub butter into self rising flour and sugar until crumbly.
- Stir in currants and vanilla.
- Beat the egg and mix to form a soft dough.
- Roll out and cut into rounds, cooking on a hot griddle for 3–4 minutes per side.
Tips:
- Keep dough slightly firm to avoid spreading.
- Dust with extra sugar after cooking.
4. Cinnamon Rolls Recipes

Cinnamon rolls are soft, sweet, and irresistibly fluffy. A self rising flour recipe ensures the dough rises evenly, producing bakery-style rolls without the hassle of yeast. Perfect for breakfast, brunch, or dessert, these rolls are easy to make at home and ideal for family gatherings, special occasions, or weekend treats.
Ingredients:
- 2 cups self rising flour
- 1/4 cup sugar
- 1/2 tsp salt
- 1/4 cup butter, softened
- 2/3 cup milk
- 1 tsp cinnamon
- 2 tbsp brown sugar
Steps:
- Mix flour, sugar, and salt.
- Add butter and milk, kneading into a soft dough.
- Roll out dough, sprinkle cinnamon and brown sugar, and roll into a log.
- Cut into 12 rolls and bake at 375°F (190°C) for 20 minutes.
Tips:
- Brush tops with melted butter for extra softness.
- Serve warm for best flavor.
4. Buttermilk Biscuits Recipes
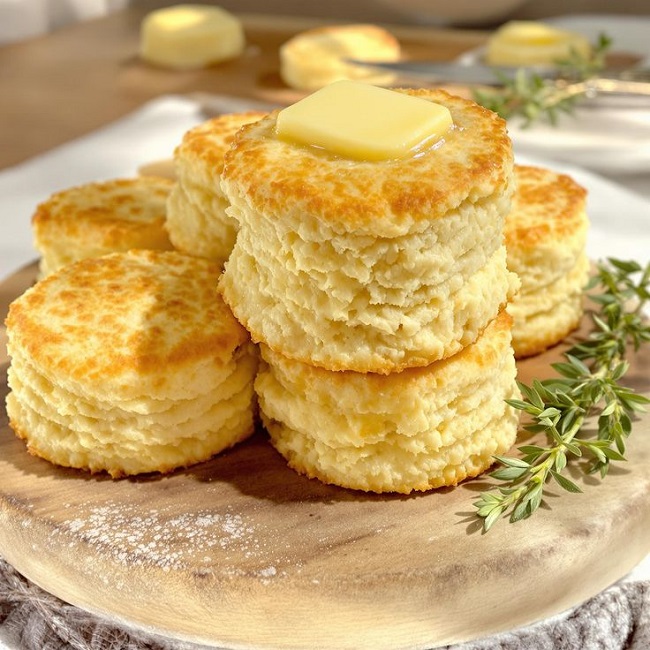
Buttermilk biscuits are a Southern classic, soft and flaky with a golden crust. Using a self rising flour recipe creates tender, perfectly risen biscuits quickly and reliably. Ideal for breakfast, brunch, or as a side for soups and stews, these biscuits are easy to make and consistently delicious.
Ingredients:
- 2 cups self rising flour
- 1/4 cup butter, cold
- 3/4 cup buttermilk
Steps:
- Preheat oven to 450°F (230°C).
- Until the mixture resembles coarse crumbs, cut the butter into the flour.
- Add buttermilk and stir until dough forms.
- Roll out and cut biscuits, bake for 10–12 minutes.
Tips:
- Handle dough gently to keep biscuits fluffy.
- Serve hot for the classic Southern experience.
Keyword tip: These are perfect biscuits with self rising flour for breakfast or brunch.
5. Cornbread Recipes

Cornbread is a staple comfort food with a soft, tender crumb and slightly crisp crust. Using a self rising flour recipe lightens the batter, producing fluffy, perfectly baked cornbread. Great alongside chili, soups, or barbecue, this recipe ensures a consistent texture and makes homemade bread with self rising flour simple and delicious.
Ingredients:
- 1 cup self rising flour
- 1 cup cornmeal
- 1/4 cup sugar
- 1 cup milk
- 1/4 cup vegetable oil
- 1 egg
Steps:
- Preheat oven to 400°F (200°C).
- Mix dry ingredients, then stir in milk, oil, and egg.
- Pour into a greased pan and bake for 20–25 minutes.
Tips:
- Serve with honey or butter for a traditional taste.
- Using self rising flour creates a lighter, softer cornbread than using cornmeal alone.
6. Self Rising Flour Pancakes Recipe
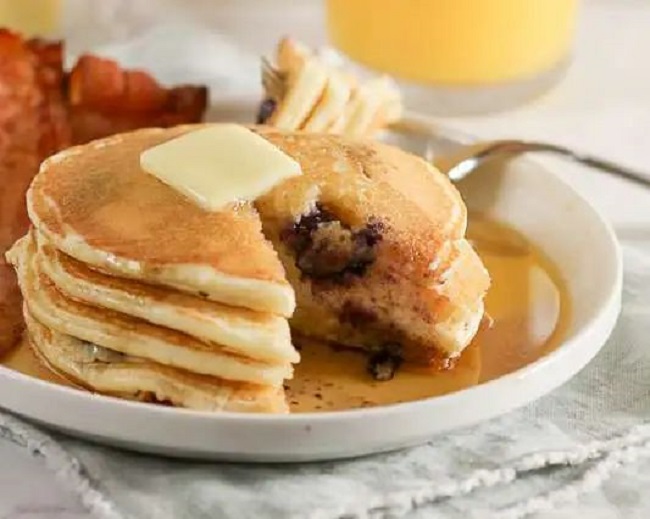
Fluffy pancakes are a breakfast favorite, and a self rising flour recipe guarantees soft, airy pancakes every time. Quick and easy to prepare, these pancakes cook evenly and pair perfectly with syrup, fresh fruit, or whipped cream. Ideal for family breakfasts or weekend brunch, they are simple enough for beginners to master.
Ingredients:
- 1 cup self rising flour
- 1 cup milk
- 1 egg
- 2 tbsp sugar
- 1 tbsp melted butter
Steps:
- Whisk milk, egg, and butter.
- Fold in self rising flour and sugar until smooth.
- Cook on a hot griddle 2–3 minutes per side until golden.
Tips:
- Use medium heat to avoid burning while cooking thoroughly.
- Serve with syrup, fruits, or whipped cream.
Why Make Self Rising Flour at Home?
Creating your own self rising flour recipe at home comes with multiple benefits that store-bought flour can’t always offer. From freshness to customization, making it yourself ensures superior baking results while saving money.
Key Benefits of Homemade Self-Rising Flour
1. Freshness & Flavor Control
One of the biggest advantages of a homemade self rising flour recipe is the freshness it provides. Store-bought flour can lose potency over time, affecting the rise and taste of your baked goods. When you mix your own flour:
- You ensure the baking powder is fresh and active.
- You control the flavor and texture.
- You can experiment with different flour types like whole wheat, spelt, or gluten-free blends.
2. Cost Savings
Making your own self-rising flour is budget-friendly:
- Pre-mixed self-rising flour is often more expensive.
- All you need are staple ingredients: all-purpose flour, baking powder, and salt.
- Minimal packaging reduces waste and supports eco-friendly practices.
3. Dietary Customization
Homemade self rising flour recipe allows full control over dietary preferences:
- Reduce or eliminate salt for a low-sodium diet.
- Use gluten-free flour blends for sensitive diets.
- Adjust leavening agents for different baking techniques or recipes.
Quick Comparison: Homemade vs Store-Bought Self-Rising Flour
| Feature | Homemade Self-Rising Flour | Store-Bought Self-Rising Flour |
|---|---|---|
| Freshness | Maximum freshness, just mixed | May be months old |
| Flavor Control | Full control over taste | Limited flavor customization |
| Cost | Low, pantry staples | Higher price per cup |
| Customization Options | Fully adjustable | Limited or none |
| Eco-Friendly | Minimal packaging | More packaging waste |
Why Make Your Own Flour?
Making your own self rising flour recipe is not only practical but also enhances your baking. The benefits of homemade self-rising flour include:
- Fresher, fluffier baked goods.
- Cost-effective baking without sacrificing quality.
- Full control over ingredients for health or dietary needs.
- Ability to tweak recipes for personal taste and texture preferences.
Self Rising Flour vs All-Purpose Flour
For home bakers, understanding the difference between self rising flour and all-purpose flour is essential for perfect baking. A self rising flour recipe includes pre-mixed baking powder and salt, whereas all-purpose flour is plain and requires added leavening. Choosing the right flour ensures your baked goods have the ideal texture, rise, and flavor.
Nutritional Facts
Both flours are wheat-based, but self rising flour contains added ingredients, which slightly changes its nutritional profile:
| Nutrient (per 100g) | Self Rising Flour | All-Purpose Flour |
|---|---|---|
| Protein | 10–11g | 10–12g |
| Carbohydrates | 72–75g | 72–76g |
| Sodium | 400–500mg | 0mg |
| Fat | 1–2g | 1–2g |
| Fiber | 2–3g | 2–3g |
Tip: Higher sodium in self rising flour affects recipes if substituted directly, so adjustments are necessary when following a self rising flour recipe with all-purpose flour.
Texture & Baking Results
Using a self rising flour recipe produces soft, fluffy baked goods that rise quickly. It’s ideal for pancakes, biscuits, muffins, and sponge cakes. In contrast, all-purpose flour yields a firmer, more structured texture, perfect for bread, pie crusts, and cookies.
Quick Comparison:
- Self Rising Flour: Light, airy, beginner-friendly
- All-Purpose Flour: Dense, structured, versatile
When Should You Use Which?
Use Self Rising Flour When:
- Baking biscuits, muffins, pancakes, or sponge cakes
- You want consistent, tender rise
- Making a DIY self rising flour recipe for freshness and control
Use All-Purpose Flour When:
- Baking yeast bread, cookies, or pie crusts
- You need full control over leavening agents
- Recipes call for a firmer, more structured texture
Comparison Table – Easy Reference
| Feature | Self Rising Flour | All-Purpose Flour |
|---|---|---|
| Leavening Agents | Pre-mixed (baking powder) | None (add as needed) |
| Salt Content | Pre-added | None |
| Best For | Pancakes, biscuits, cakes | Bread, cookies, pastries |
| Texture Outcome | Soft, fluffy | Firm, structured |
| Beginner-Friendly | High | Moderate |
Substitutes for Self Rising Flour (If You Don’t Have It)
A self rising flour recipe is a kitchen essential for fluffy, tender baked goods. But what if you don’t have it on hand? Fortunately, there are several easy ways to create a self rising flour substitute or alternative that works just as well. Understanding how to replace self rising flour ensures your cakes, pancakes, muffins, and biscuits turn out perfectly every time.
Easy Homemade Substitute Formula
The simplest method is to make a DIY self rising flour substitute using ingredients you likely already have in your pantry.
Homemade Formula:
- 1 cup all-purpose flour
- 1 1/2 tsp baking powder
- 1/4 tsp salt
Instructions:
- Combine all ingredients thoroughly in a bowl.
- Sift the mixture for even distribution.
- Use immediately as a 1:1 replacement for self rising flour in any recipe.
✅ Pro Tip: This quick DIY method guarantees a fresh self rising flour recipe with perfect rise and texture.
Gluten-Free Alternatives
For gluten-sensitive bakers, a gluten-free version works just as well.
Gluten-Free Substitute Formula:
- 1 cup gluten-free all-purpose flour
- 1 1/2 tsp gluten-free baking powder
- 1/4 tsp salt
- Optional: 1 tsp xanthan gum for structure
Best Uses: Muffins, pancakes, and biscuits.
Tip: Using a gluten-free flour blend as a self rising flour substitute ensures soft, fluffy results without compromising dietary restrictions.
Whole Wheat Options
Whole wheat flour offers a healthier alternative, though it produces a slightly denser texture.
Whole Wheat Substitute Formula:
- 1 cup whole wheat flour
- 1 1/2 tsp baking powder
- 1/4 tsp salt
Tips for Best Results:
- Combine half whole wheat and half all-purpose flour for lighter baked goods.
- Sift the flour to aerate and remove lumps.
- Ideal for self rising flour recipes like quick breads and pancakes.
Store-Bought Substitutes
Convenience is also an option. Some store-bought products can act as a self rising flour substitute:
- Pre-mixed baking mixes such as Bisquick or pancake mix
- Gluten-free pre-mixed flour blends
- Whole grain baking mixes containing baking powder
Pro Tip: Adjust liquid, sugar, or salt if the pre-mix contains added ingredients to match your recipe.
Quick Comparison Table
| Substitute Type | Ingredients | Best Uses |
|---|---|---|
| Homemade DIY | AP flour + baking powder + salt | Pancakes, muffins, biscuits |
| Gluten-Free | GF flour + baking powder + xanthan gum | Muffins, pancakes, cakes |
| Whole Wheat | Whole wheat flour + baking powder + salt | Quick breads, pancakes |
| Store-Bought Pre-Mix | Bisquick, pancake mix, GF blends | Pancakes, muffins, quick breads |
Storage & Shelf Life Tips for Self Rising Flour
A self rising flour recipe is a baking essential, but even the best homemade or store-bought flour can lose potency if not stored properly. Understanding how to store self rising flour and answering the common question does self rising flour go bad ensures your baked goods remain light, fluffy, and flavorful every time.
Use Airtight Containers
Keeping your flour in an airtight container is the most important step to maintain freshness and prevent moisture contamination.
Storage Tips:
- Choose glass, plastic, or metal containers with tight-fitting lids.
- Label containers with the preparation date if you make your own self rising flour recipe.
- Avoid storing flour in paper bags, which allow air and humidity to degrade quality.
Room Temperature vs Refrigeration
Room Temperature Storage:
- Suitable for daily baking needs.
- Store in a cool, dry cupboard away from sunlight and heat.
- Homemade self rising flour recipe lasts about 1–2 months at room temperature.
Refrigeration or Freezing:
- Extends shelf life up to 6 months.
- Store in an airtight container or heavy-duty freezer bag.
- Bring flour to room temperature before using to prevent clumping and uneven baking.
✅ Pro Tip: If your kitchen is warm or humid, refrigeration is recommended to maintain the rising recipes power of your flour.
Signs of Spoiled Flour
Knowing does self rising flour go bad helps avoid ruined baked goods. Common warning signs include:
- Rancid or unpleasant odor
- Clumping due to moisture
- Discoloration or mold growth
- Weak rising action (baking powder may have lost effectiveness)
If any of these signs appear, discard the flour and prepare a fresh self rising flour recipe for best results.
Quick Storage Guide
| Storage Method | Container Type | Shelf Life | Notes |
|---|---|---|---|
| Pantry (Room Temp) | Airtight container | 1–2 months | Ideal for everyday baking |
| Refrigerator | Airtight container | 3–4 months | Preserves baking powder potency |
| Freezer | Airtight container | 5–6 months | Thaw before use; prevent clumps |
Common Mistakes to Avoid with Self Rising Flour Recipe
A self rising flour recipe is a versatile baking essential, perfect for making biscuits, pancakes, muffins, and cakes. However, even experienced bakers can make avoidable mistakes that compromise texture, rise, and flavor. Knowing mistakes when baking with self rising flour and how to prevent them ensures consistent, professional results.
1. Using Too Much Baking Powder
One of the most common mistakes when baking with self rising flour is adding extra baking powder. Self rising flour already contains the correct proportion of leavening agents. Adding more can:
- cause baked items to collapse after rising too quickly.
- Leave a bitter or metallic aftertaste
- Create uneven or coarse texture
Pro Tip: Follow the recipe exactly. A properly made self rising flour recipe already provides the ideal leavening balance for light, fluffy baked goods.
2. Choosing the Wrong Flour Type
Using the wrong flour is another frequent error. Bread flour or cake flour directly substituted for self rising flour can lead to:
- Denser baked goods if high-protein flour is used
- Fragile or crumbly texture if low-protein flour is used
Solution: Use all-purpose flour as the base for a DIY self rising flour recipe, combining it with baking powder and salt. This ensures consistent rise, structure, and texture in all recipes.
3. Ignoring Freshness Dates
Flour and baking powder lose potency over time. Ignoring the freshness of ingredients is a common reason baked goods fail to rise.
Signs your flour is stale:
- Off or rancid smell
- Clumping due to moisture
- Poor rise in baked products
Tip: Always check ingredient freshness and prepare a fresh self rising flour recipe if needed. Using fresh flour guarantees optimal performance and the best texture.
Quick Reference Table
| Mistake | Effect on Baked Goods | How to Avoid |
|---|---|---|
| Too much baking powder | Bitter taste, collapsed texture | Measure accurately; trust your self rising flour recipe |
| Wrong flour type | Dense or crumbly texture | Use all-purpose flour as a base |
| Ignoring freshness date | Poor rise, stale flavor | Make fresh self rising flour recipe when needed |
Conclusion
Self rising flour recipe is one of the easiest ways to elevate your home baking. By making it yourself, you ensure fresh, fluffy, and perfectly textured baked goods every time. Unlike store-bought versions, a homemade self rising flour recipe gives you full control over ingredients, letting you avoid unnecessary additives and customize the flavor for your favorite recipes.
Using a self rising flour recipe at home can transform simple ingredients into professional-quality biscuits, pancakes, muffins, and cakes. It saves both time and money, while also giving beginners and experienced bakers alike consistent, reliable results. Learning this recipe allows you to experiment with different flour types or even create gluten-free versions, making it versatile for every kitchen.
For anyone who loves baking, mastering a rising recipes is a game-changer. It’s quick, easy, and perfect for daily baking needs. With the step-by-step guide provided in this post, you can start creating fresh, homemade flour blends that make every baked item soft, light, and delicious.
Start baking today with your homemade self rising flour recipe! Experience how this simple, budget-friendly recipe can completely transform your baking at home.
FAQs,
Can I replace all-purpose flour with self rising flour?
Yes, you can replace all-purpose flour with a self rising flour recipe in most baking recipes. Keep in mind that self rising flour already contains baking powder and salt, so you may need to reduce or skip additional leavening to avoid overly salty or overly fluffy results. Using this substitution is perfect for biscuits, pancakes, muffins, and quick breads.
How much baking powder per cup of flour?
For a standard self rising flour recipe, add 1 1/2 teaspoons of baking powder and 1/4 teaspoon of salt per cup of all-purpose flour. This ratio ensures baked goods rise evenly and achieve a light, fluffy texture without being too dense. Accurate measurements are key to successful baking.
Can I use self rising flour for pizza dough?
Technically yes, but a self rising flour recipe produces a softer, fluffier crust, unlike traditional chewy pizza dough. For classic pizza, all-purpose or bread flour is usually preferred. However, if you want a quick, fluffy homemade pizza crust, self rising flour can be a convenient option.
Is self rising flour the same as cake flour?
No. Cake flour has lower protein content, producing a delicate, soft crumb, while a rising recipes is made from all-purpose flour mixed with baking powder and salt. It can substitute in cakes if you don’t mind a slightly different texture, but the results may not be as tender as with cake flour.
Can I make gluten-free self rising flour?
Yes! You can create a gluten-free self rising flour recipe using a gluten-free flour blend, xanthan gum, and baking powder. Adjust the ratios carefully to mimic the rise, texture, and softness of traditional self rising flour for cakes, muffins, and biscuits.
How should I store homemade self rising flour?
Store your self rising flour recipe in an airtight container in a cool, dry place. It typically stays fresh for up to 3 months. Proper storage prevents moisture and ensures the baking powder retains its effectiveness for perfect rising every time.